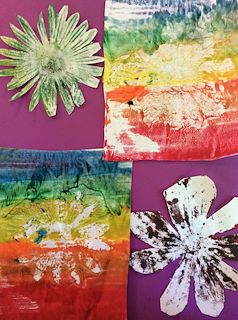
We had some extra time in 5th grade, so we experimented with aluminum foil printmaking. They drew a design of their choice with a Sharpie marker on their paper. Then we used washable markers on foil and water to turn the markers into paint. Then we took a monoprint of the color onto our papers. Interesting results and it may be a technique we incorporate into future projects. :)
Showing posts with label printmaking. Show all posts
Tuesday, September 3, 2019
Friday, August 30, 2019
Marbled Paper Starry Night
Shaving cream marbling is always so fun and creates amazing results! 2nd grade used this technique to emulate the movement we see in Van Gogh's Starry Night.
After the paper dried, we used black paper and yellow & white oil pastels to add scenery to our artworks.
Wednesday, February 14, 2018
Andy Warhol Prints
This was my first time use Gelli Printing plates in the classroom, and they are awesome! We used regular liquid tempera paints instead of printing ink. After viewing the works of Andy Warhol, focusing on his flower artworks and discussing the printing process, we used fake flowers and Gelli plates to create these gorgeous collages!
Students printed as much as they could in one class period. During the next class time, they cut up their "best" ones and made collages. Love these and I will definitely be using Gelli plates again!
Thursday, March 24, 2016
Marker Prints Forever!
During my time at the Frist Center, I helped with literally 1000s of printmaking activities. I do love printmaking, but with limited space, it's kind of challenging in the classroom, especially with rambunctious groups.
| Image from Cassie Stephens "Troubleshooting Printmaking" |
Then Cassie Stephens made a post about marker prints that made printing accessible for every project. She found the idea from art teacher Don Masse over at Shine Brite Zamorano.
Basically, you cut styrofoam into whatever shape you want and use a stylus or pencil to carve details. Same as regular printmaking so far. Then, instead of using ink or paint, you color on the styrofoam with washable markers.
After that, you get your paper wet. First, I tried spray bottles and it did not work at all. Then I tried rubbing the paper with a sponge and the results were great! I gave my kids brayers to roll over their styrofoam to get even pressure. They turn out beautiful, bright, and the kids can recreate this with stuff they have at home! Love marker prints, marker prints forever!
We did this with our Pop Art unit, so there is a lot of food. :P
Monday, July 6, 2015
Frist Summer Art Camp: Carved Initial Stamps
The first day of Summer Art Camp (SAC) at the Frist Center is done! We made stab-bound sketchbooks, portfolios, origami, paper bowls (as seen at Camp STEM last month), and carved initial stamps.
![]() |
| Sample initial designs for inspiration. Can you find Gustav Klimt's initial? |
Many of our artworks are based on the Wiener Werkstatte Exhibit. On many WW artworks, you see a square initial design as an artist signature.
First, the campers practiced many options in their sketchbook until they found a design they like. They had to remember to make the letters backwards. They had the option to be inspired by Art Nouveau text styles and designs.
We used linoleum tools to carve into our material. It is similar to an eraser, but very smooth. Before they could carve, they drew their design on a post-it note. Then they drew it on the linoleum and colored in the important parts with a sharpie. They were told to carve all of the white parts to ensure that they cut the right parts.
| A great result! The initials "PLP" in a unique design with Art Nouveau designs. |
I love the process here! You can see their design options sketched out, the carving, and the print for the initials "IMC". Great work!
We'll use these as the signatures on our artworks this week.
Wednesday, May 13, 2015
STEM Practice: Collographs
![]() |
| Collograph plate |
![]() |
| Collograph print |
The theme at Camp STEM's summer session for art projects is Recycled Art. I have a ton of ideas, and now I have to start making sure they will work! At home, I have paints and a roller, but no ink.
The flowers above went okay, but I think that with real printing ink it will be better.
Here's a video of process, cat included. I'm actually impressed that he stayed to the perimeter instead of laying directly in the paint. Good boy.
I liked the flower, but I thought the white background was a bit boring. Next I tried adding a background by using a monoprint technique on a plastic bag. I found a great tutorial on Alisa Burke's website. It's a pretty easy process and I think the kids will enjoy it.
![]() |
| Cardboard collograph plate |
![]() |
| Collograph on monoprint background |
Subscribe to:
Posts (Atom)